Custom Iron On Patches: The Ultimate Guide to Stylish and Durable Apparel Customization
You have seen them everywhere. Denim jackets covered in colorful, stitched artwork. Baseball caps with bold logos on the front. Backpacks adorned with quirky, personalized emblems. Even high-end fashion runways have embraced the humble patch, turning it into a statement piece. What was once a practical way to repair clothing has exploded into a major trend in both fashion and branding. The driving force behind this revival is custom iron on patches. They offer a unique blend of nostalgia, personal expression, and professional durability that printed graphics simply cannot match.
Let me explain why custom iron on patches have captured the imagination of designers, brand managers, and everyday consumers. Unlike mass-produced prints, patches add texture and depth. They feel substantial and look handcrafted. For fashion lovers, patches are a way to customize off-the-rack clothing and make it one of a kind. For businesses, patches turn employees and customers into walking billboards that convey quality and attention to detail. In this ultimate guide, I will cover everything from design to application, so you can create patches that look great and last for years.
Why Choose Iron On Patches Over Other Customization Methods
You have options when it comes to decorating apparel. Screen printing, heat transfer vinyl, direct-to-garment printing, and embroidery all have their place. But iron on patches offer distinct advantages. First, they are portable. You can make a patch and apply it to any compatible fabric, whether it is a jacket, a bag, a hat, or even a pair of jeans. Second, they are durable. A well-made patch survives dozens of washes, harsh weather, and daily wear. Third, they feel premium. The raised stitches and textured surface give a handcrafted, artisanal vibe that flat prints cannot replicate. Fourth, they are versatile. You can sew them, iron them, or even attach them with Velcro for interchangeable looks. For businesses, patches are a cost-effective way to brand merchandise without committing to large print runs. For individuals, they offer endless creative possibilities.
The Anatomy of a High-Quality Iron On Patch
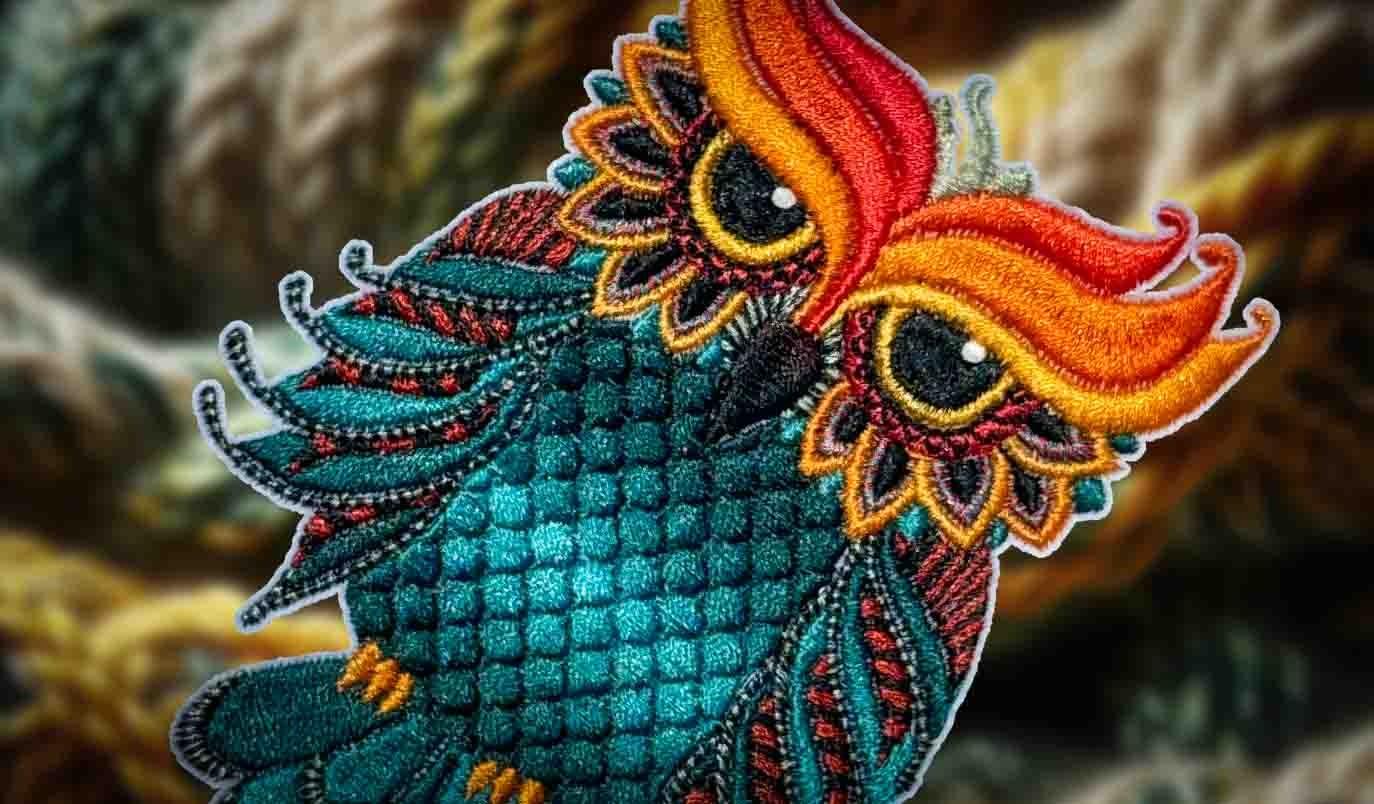
Not all patches are created equal. A high-quality custom iron on patch has several key components. The base fabric is usually twill or felt, which provides a stable surface for embroidery. The embroidery itself uses high-thread-count polyester or rayon thread for vibrant, fade-resistant colors. The edges are merrowed, meaning they are tightly stitched with a raised border that prevents fraying and gives a professional finish. The backing is a heat-activated adhesive that bonds firmly to fabric when pressed with an iron. Some patches also have a protective film over the adhesive that you peel off before application. A good patch lies flat, has no loose threads, and feels substantial in your hand. Cheap patches use thin thread, weak adhesive, and poor edge finishing. They curl, peel, and fade quickly. When ordering custom iron on patches, always ask about these quality details.
Designing Your Patch for Maximum Impact
The design phase is where your creativity shines. But embroidery has limitations that you need to understand. Start with a clean, high-contrast artwork. Complex gradients, drop shadows, and tiny text do not translate well to thread. Simplify your design to solid colors and bold shapes. Text should be at least a quarter inch tall to remain readable. If your logo has fine details, consider enlarging the overall patch size. Think about the border. A merrowed edge adds a professional finish and helps the patch stand out. Consider the shape. Circular, rectangular, and shield shapes are classic, but custom die-cut shapes (following the outline of your design) look modern and eye-catching. Choose thread colors carefully. They will look slightly different on fabric than on screen. Many patch makers offer thread color charts so you can match your brand colors accurately. Finally, order a sample before committing to a large run. Seeing the patch in person lets you catch design issues early.
How Iron On Patches Are Made
The manufacturing process for custom iron on patches involves several steps. First, your artwork is digitized. A professional embroidery digitizer converts your design into a stitch file that tells the embroidery machine where to punch. Second, the machine embroiders the design onto a base fabric like twill. Multiple machines can run simultaneously for large orders. Third, the patches are cut out. For merrowed edges, a specialized machine sews a tight border around the patch, then cuts it. Fourth, a heat-activated adhesive backing is applied. This adhesive melts when pressed with an iron, bonding the patch to your garment. Fifth, the patches are inspected for quality. Loose threads, misaligned edges, or weak adhesive trigger a rejection. Finally, the patches are packaged and shipped. The entire process takes several days to a few weeks, depending on order size and complexity. Understanding this process helps you appreciate why quality patches cost more than cheap alternatives.
Preparing Your Garment for Iron On Application
The success of your custom iron on patches depends not just on the patch itself, but on how you apply it. Preparation is everything. Start with a clean, dry garment. Wash it if it is new, because new fabrics often have chemical coatings that prevent adhesion. Do not use fabric softener, as it leaves a residue that repels the adhesive. Press the area where you plan to place the patch with a dry iron for ten seconds. This removes moisture and flattens any wrinkles. Place the garment on a hard, flat surface like an ironing board or a table covered with a cotton towel. Make sure the surface is heat-safe. If you are applying to a thick item like a jacket, use a rolled towel inside to create a firm, flat pressing area. Do not skip these steps. Proper preparation ensures the adhesive bonds fully and the patch stays attached.
Step-by-Step Iron On Application Guide
Now you are ready to apply your custom iron on patches. Follow these steps for best results. Preheat your iron to the highest cotton or linen setting without steam. Let it heat up fully for at least five minutes. Place the patch on the garment, adhesive side down. Position it exactly where you want it. Cover the patch with a thin cotton cloth or a piece of parchment paper to protect both the patch and the iron. Press the iron firmly onto the patch. Use your body weight to apply even pressure. Hold the iron in place for 15 to 20 seconds. Do not slide the iron around. After pressing, lift the iron and let the patch cool for a few seconds. Then, turn the garment inside out and press the back of the patch area for another 10 seconds. This double-press method significantly improves adhesion. Let the patch cool completely for a few minutes before handling. For extra security, you can sew around the edges with a matching thread.
Common Application Mistakes to Avoid
Even the best custom iron on patches can fail if you make these mistakes. Mistake one: using steam. Steam prevents the adhesive from bonding properly. Always use a dry iron. Mistake two: insufficient heat. If your iron is too cool, the adhesive will not melt. Use the highest cotton or linen setting. Mistake three: not enough pressure. Lightly touching the iron does not activate the adhesive. Press firmly with your body weight. Mistake four: moving the iron. Sliding the iron can shift the patch out of position. Press and hold. Mistake five: not pre-pressing the garment. New fabrics have coatings that block adhesion. Pre-press to remove them. Mistake six: washing too soon. Wait at least 24 hours before washing the garment to allow the adhesive to fully cure. Mistake seven: using fabric softener in the wash. Softeners break down the adhesive. Avoid them. Avoid these mistakes, and your patches will stay attached for years.
Caring for Your Iron On Patches
Once your custom iron on patches are applied, proper care extends their life. Turn the garment inside out before washing. Use cold or warm water, not hot. Use a gentle cycle. Do not use bleach or fabric softener. Air drying is best. If you must use a dryer, use the lowest heat setting and remove the garment while it is still slightly damp. High heat can weaken the adhesive and cause the edges to curl. Do not iron directly on the patch after application. The high heat can melt the adhesive again and distort the design. If you need to remove the patch, apply heat with an iron or a heat press to soften the adhesive, then peel it off gently. Residue can be removed with adhesive remover or rubbing alcohol. With proper care, your patches will remain vibrant and firmly attached for years.
Creative Uses for Iron On Patches
Custom iron on patches are not just for uniforms and jackets. The possibilities are endless. Use them to personalize denim jackets, jeans, and vests. Create a themed collection on a tote bag or backpack. Add your brand logo to employee aprons, caps, and polo shirts. Make custom patches for sports teams, scouts, or clubs. Use patches to repair torn clothing in a stylish way. Create commemorative patches for events, anniversaries, or reunions. Decorate pillows, blankets, or curtains. Make matching patches for family members or friends. Use patches as gifts or party favors. Some people even frame patches as art. The only limit is your imagination. For businesses, patches are a low-cost, high-impact way to build brand recognition and customer loyalty.
The Future of Custom Iron On Patches
The patch trend shows no signs of slowing down. Technology is making patches more detailed and more accessible. 3D puff patches with raised foam are popular for logos and lettering. Glow-in-the-dark and metallic threads add novelty. Patches with interchangeable Velcro backs are growing in the outdoor and military markets. Fashion brands are experimenting with patches on unexpected items like shoes, hats, and evening wear. Online design tools let you create your own patch designs from scratch. Sustainability is also driving interest in patches. They allow you to update and repair existing garments, reducing waste. As technology and trends evolve, custom iron on patches will remain a versatile, stylish, and durable way to customize apparel.
Conclusion
Custom iron on patches offer a unique blend of style, durability, and personal expression. They are easy to apply, long-lasting, and versatile enough for fashion, branding, and personal projects. Start with a clean, high-contrast design. Choose a quality patch maker who uses strong thread and adhesive. Prepare your garment properly and follow the application steps carefully. Avoid common mistakes like using steam or insufficient pressure. Care for your patches by washing gently and air drying. Whether you are refreshing your wardrobe, promoting your business, or creating a unique gift, patches are a smart, stylish choice. They turn ordinary clothing into a canvas for creativity and identity. So design your custom iron on patches today and start making your mark.